Project 008
Ragnar, The Ranger
2001 Ford Ranger XLT 4x4
SOLD
Sale Sheet
If you don't like to read, plenty of pictures are below! :)
Our goal with Ragnar was to build and sell an awesome 4x4 truck for under $10K. That's just what we did...and we are tempted to keep it, but here we are.
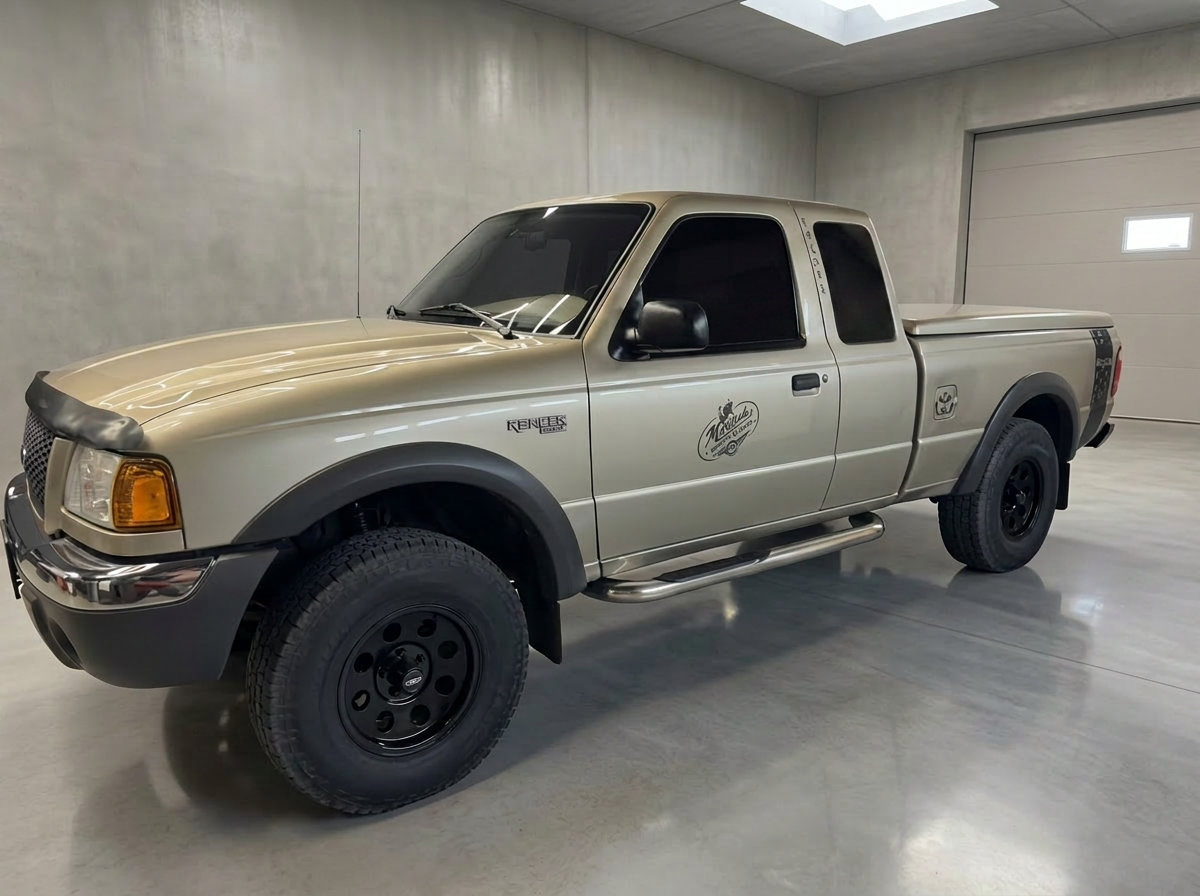
This 2001 Ford Ranger XLT 4X4 with the 4.0 V6 is a Colorado original car. It just hit 25 years old! But what a truck. With 177K Miles, this represents an average of just 7K Miles a year. What we bought was a great running truck with all major components working appropriately, 4X4 engaging great, automatic transmission shifting smoothly, and more.
But Ragnar the Ranger needed some love. So, we got to work.
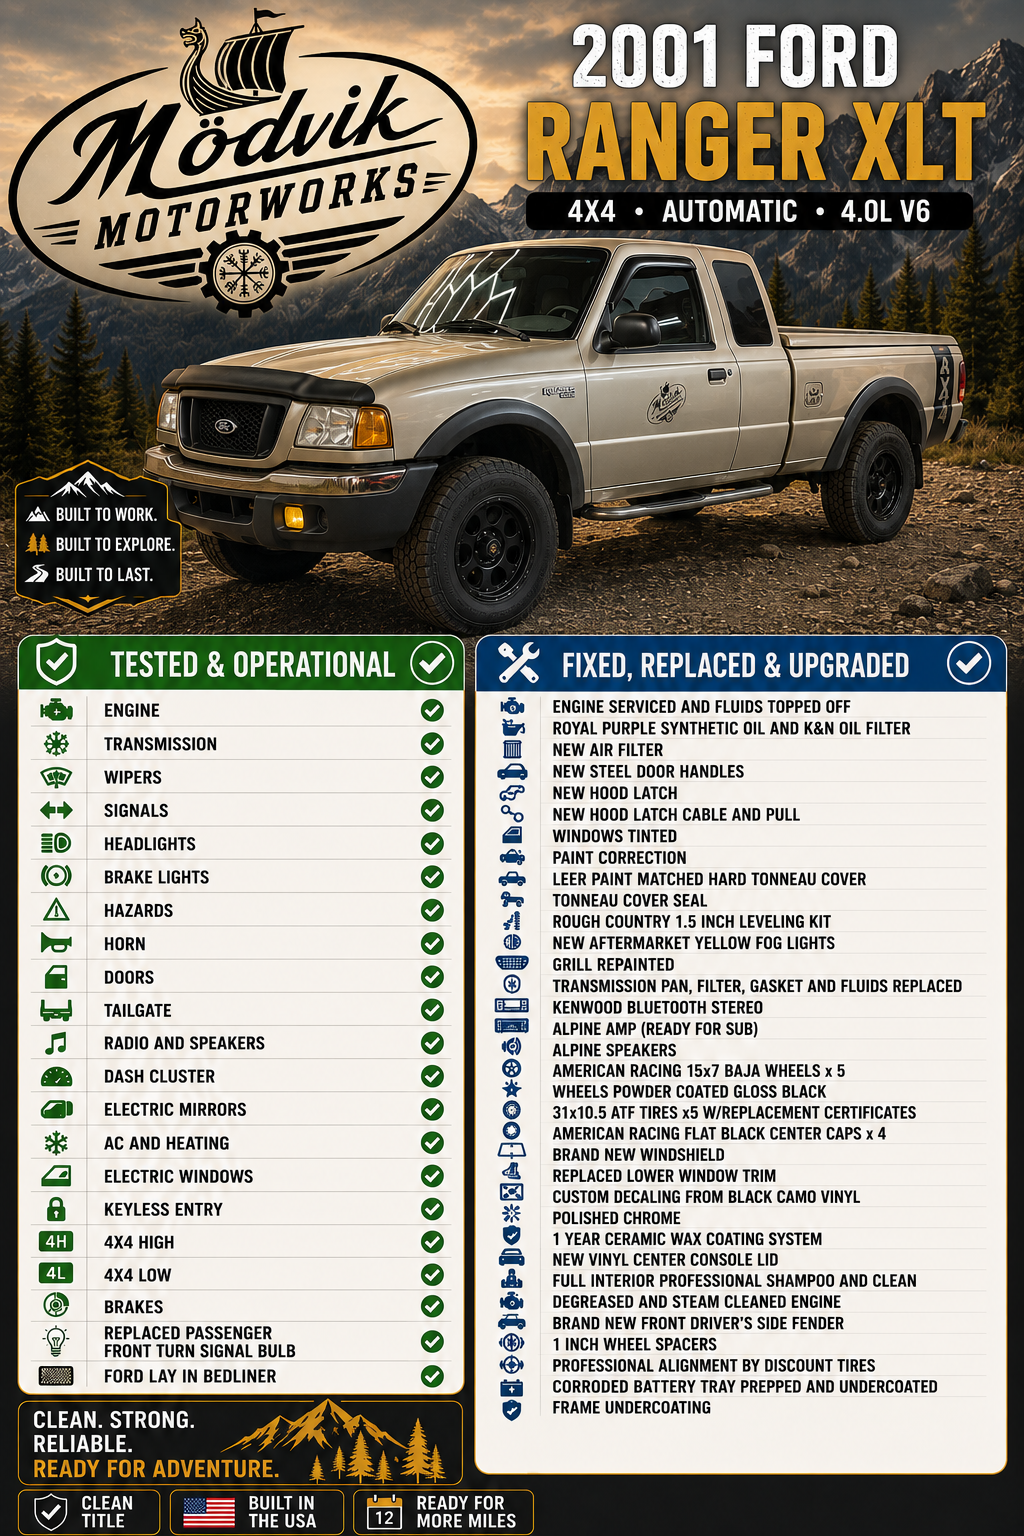
New Black Steel Door Handles — The old plastic faded and riveted door handles were gross and one was broken, only being able to be opened from the inside. We replaced both and fixed any locking issues. Now, works perfect!
Brand New Hood Latch and Latch Cable — The cable was shredded and you needed pliers to open the hood by gripping the old cable. So out with both of those old parts and some tricky maneuvering later, we got the new cable and latch in. Once we adjusted the latch a few times, everything sat nicely and works like a charm.
The passenger side fog light housing was horribly cracked. We took this opportunity to fit in new, yellow fog light housing and modern bulbs, replacing the whole shebang. Love the new color and it stands out nicely on the build.
Though the engine was running great and I drove this home from purchase five hours over the mountains with no issues, I never trust what was done before. We completed a full inspection, checked for leaks, drained the old oil, checked all fluid levels, then used a K&N oil filter and Royal Purple full synthetic for the refresh. We topped off all other fluids after checking quality, then dropped in a fresh air filter.
The engine was 25 years of dirty, so we deep cleaned with some degreaser and washing, then some steam, heated dry, then treated various areas with surface protectant. A previous battery caused some ugly corrosion on the battery tray, so while the battery was out for cleaning, we ground the bad areas of the tray, prepped the metal, then sprayed with undercoating to preserve and protect. To finish off under the hood, we removed the front plastic molding — cleaned, scuffed, coated in plastic adhesion promoter, then sprayed with satin black.
While we were painting, we noticed the front honeycomb grill was faded gray. We had to bring this back to life as well, so followed the same steps and now it looks brand new.
Some parts of this build were already nicely done, so we inspected, cleaned, and/or tested. The window tint all around is flawless. The Kenwood connected perfectly to our iPhones and plays via Bluetooth. We took off the door skins when we did the door handles and used that opportunity to inspect speaker wires, clean the speakers, and test them. All good there!
The interior was dirty. Like dirty dirty. So, we unbolted the seats and began the deep clean having had professional experience in this area. Once the seats were out, we were able to get going. First came various levels of stain remover and drill clean. Repeat. Then came upholstery shampoo and drill clean. Finally, we added our secret combo of carpet cleaning products, drill cleaned that, then used our Bissell to scrub everything one more time and vacuum out all the water and remainder. We set in the sun to dry with the windows down and treated with Febreze for automotive. We then treated the seats in the same order and sewed up the one rip in the driver's seat. They look loads better, but not perfect. I would drive it as it sits, clean and smelling fresh, but the new owner may want some snug fit color matched seat covers. The last touch here was to replace the cracked and ugly as hell center console cover. We color matched it but switched to an easier maintained vinyl with a non-slip section for your phone!
While the seats were out, we got to work perfecting the install of the Alpine amplifier and made sure to leave speaker wire in case someone wanted to add a sub in the back. We finished the interior surfaces with a steam clean, deep clean, and surface protectant and shine.
Look up those paint matched hard tonneau covers. Something in the 2K range for the Ranger. This one simply had an old, faded and cracked tape seal. Plus, it was gray. We replaced that with a new seal in black to make sure no water got in the bed, tested the cover shut and open, and made sure there were no cracks in the Ford lay-in liner. That thing needed some serious cleaning, so a lot of Simple Green and power washing did the trick. The new spare fifth wheel and tire are resting quietly there in case ever needed.
We knew we wanted an off-road look and feel and to do justice to this 4X4 in Colorado, so we had to make some room in the front. Plus these trucks don't sit level, but rather 1.5 inches higher in the back. We installed the Rough Country 1.5 inch level kit that makes room for 32s, though we still went with 31s to make sure we weren't going to rub. The kit worked great and the truck now sits tall and level. AND, this kit is adjustable slightly up or down with the turn of a socket wrench. The new torsion keys in a beautiful black powder coat are clearly visible under the truck. This install requires some simple grinding, so we made sure to treat those surfaces with Rustoleum black to prevent rusting the bare metal.
One of our sponsors, Montrose Auto Glass, came to the rescue and installed a brand-new windshield and seal. The old one was horribly cracked but didn't phase us in this build as we knew they would take care of us. Nothing better than a perfectly clean front screen. We also treated the glass with the same ceramic based wax system for water beading and protection.
Before installing the new wheels and tires, we wanted to treat exposed and surface rusted frame metal. We did so with some cleaning, followed by some wire brushing, then treatment with Rustoleum's Rust Reformer. Once dry, we coated these areas in undercoating to protect even more. Before and after pics for these areas available to prove we weren't painting over anything serious. It's Colorado guys! Dry as a bone.
Next came paint correction. Keep in mind this is 25 year old paint all around. We brought it back to life though. There are still small visible, but faint scratches, and a few dings and paint chips, but it is now all treated and sealed. We started with power washing and cleaning all surfaces. Then, we treated the entire painted area with iron remover. This reacts to those metals and turns purple when activated. There was a lot of purple. This got rinsed and we washed again. Next, we clay barred the entire truck to remove small spots, imperfections, and anything else that would come off, and boy did it. Time for the power tools. Next we compounded the entire truck twice, wiping clean as we went. Polish was next, again twice. What a mess. Vinyl decals came after compounding (more on that later), then we used Chemical Brothers' Ceramic Waxing System for the final wax coat and protected shine. Running your fingers over the paint now is like touching perfectly clean, smooth glass.
We couldn't leave the OEM wheels on this truck with the way Ragnar was turning out. We found a used set of five American Racing Baja Wheels in a polished finish. Cool, yes. Perfect, no. We sent them to another sponsor over at XCessive Design and Coatings who stripped, blasted, perfected, then finally powder coated these wheels in a gorgeous gloss black. We found new satin black center caps online for the final touch. Our friends at Discount Tire then added the PT Pathfinder ATs in 31 by 10.5 for a damn aggressive look and off-road capability. The tires are good for 50K miles, are brand new, and come with transferable certificates of warranty.
Some final touches. Time for the custom vinyl. I hated the old 4x4 crap sticker and the weird dealer sticker as well, so out came the eraser wheel — well before paint correction. Once the car was polished, but before the wax, we added what we hope is a tasteful series of decals. Keep in mind they are all removable, but if removed, you'll want to wax those areas. First, we came up with the 4X4 banner concept, one on either side of the bed and one on the tailgate. These we designed with a border of pinstripes, a 4X4 cutout, and an awesome looking black camo vinyl. It really sets off nicely with the other black finishes like the tint, bug deflector, and wheels.
For some small Nordic themes, our company theme, we added the Younger Futhark spelling of the name Ragnarr to each door. On the driver's side, this helped cover up a ding and a small paint chip which was nice. On the rear we kept the OEM Ford emblem, but beneath gave homage to the Nordic Vegvisir compass symbol and the best motor offered in this truck, the 4.0 V6. All cut from the same vinyl. Next, we took our 1950s inspired Modvik Nordic/Viking logo and added it to the doors like they did with trucks from the past. No worries if you want this removed. We can do so for you, or you can see how you like it and remove yourself later. Don't forget to wax! We came from the custom import world, and we've seen a lot of hard covered trucks with company logo decals on the tonneau, so we copied that style and added some of the contributors to the truck there.
Want more, maybe some rugged off-road bumpers, upgraded brakes, something else? We can help. Just let us know and it can be added to the sale after initial payment for the truck.
This was a fun build and the first where our young son took part to learn and help. Ragnar has now been sold and is off on some new adventures with its new owner.
Gallery
More from the Archive